Easy Breaded Chicken Recipe You Can Make In 20 Minutes

Why This Easy Breaded Chicken Recipe Works
This easy breaded chicken recipe stands out because it delivers the perfect balance of a crispy coating on the outside and a tender, juicy inside—all in just 20 minutes, making it ideal for a quick weeknight dinner when you need something satisfying without spending hours in the kitchen. The method uses simple, accessible ingredients yet maximizes flavor and texture through the right combination of seasoned flour, egg wash, and breadcrumbs, giving you consistently crisp, golden results every time.
Unlike many breaded chicken methods that can leave the coating soggy or sliding off, this recipe follows a clear three-step dredging process (flour → egg → breadcrumbs). This creates a firm, well-adhered crust that turns beautifully golden in the skillet. The thinly sliced or pounded chicken cutlets cook fast while staying moist, preventing the common mistake of drying out the meat. Using panko breadcrumbs or a mix of panko and classic crumbs adds extra crunch, while shallow pan-frying ensures even browning without requiring deep-frying.
It also works because it adapts to multiple cooking styles—pan-fried, oven-baked, or air-fried—making it flexible for different dietary needs and equipment setups. Whether you’re aiming for a healthier version, a traditional Italian-style cutlet, or a quick protein to serve with salad, pasta, rice, or vegetables, this recipe delivers reliable results every time.
In short, it’s the perfect combination of:
Fast prep + fast cooking time
Crispy, golden crust
Tender and juicy chicken
Beginner-friendly steps
Simple ingredients you already have
Family-friendly flavors
This is the type of dish you’ll make on repeat because it’s just so easy, versatile, and delicious—exactly what people are searching for when they look up a breaded chicken recipe.
Ingredients You’ll Need

Gather all ingredients for this easy breaded chicken recipe to ensure a crispy, golden crust every time.
To make this easy breaded chicken recipe, you only need a handful of simple, everyday ingredients that come together to create a crispy coating with a tender, juicy inside. Each ingredient plays a specific role in creating the perfect crust and helping the breading stick firmly to the chicken. Here’s a breakdown of the key components you’ll be using:
✔ Chicken Breasts
Boneless, skinless chicken breasts are ideal because they can be sliced or pounded into thin chicken cutlets, which cook quickly and evenly. Their mild flavor pairs perfectly with a crunchy breadcrumb coating and light seasonings.
✔ Flour
A light dusting of all-purpose flour helps the egg wash cling to the surface of the chicken. This step prevents the breading from sliding off and creates a strong base layer for a crisp, even crust.
✔ Egg Wash
A simple mixture of beaten eggs (sometimes with a splash of milk or water) forms the second layer in the dredging station. The egg wash works as a glue that binds the breadcrumbs to the chicken.
✔ Breadcrumbs or Panko
The final layer is your breadcrumb coating. Regular breadcrumbs give a fine, even crust, while panko adds extra crunch and a light, airy texture. Both versions work—your choice depends on the crispiness level you want.
✔ Seasonings
Basic spices like salt, black pepper, garlic powder, paprika, Italian seasoning, or onion powder add flavor to the breading mixture. Seasoning both the chicken and the breadcrumb mix ensures every bite is well-balanced.
✔ Frying Oil
For shallow pan-frying, use an oil with a high smoke point such as vegetable oil, canola oil, sunflower oil, or light olive oil. These oils heat evenly and help create that signature golden-brown crust without burning.
Best Breadcrumbs to Use
Choosing the right breadcrumbs makes a huge difference in the texture of your breaded chicken recipe. Here’s a simple guide to help you decide:
⭐ Panko Breadcrumbs (Most Crispy Option)
Light, airy, and extra crunchy
Ideal for restaurant-style chicken cutlets
Great for frying, baking, or air-frying
Creates a golden, flaky crust
Use panko if you want maximum crispiness and a Japanese-style cutlet texture.
⭐ Regular/Classic Breadcrumbs
Finer texture
Creates a more uniform coating
Ideal for traditional Italian breaded chicken
Excellent for Parmesan crusts
Use classic breadcrumbs for a thinner, tighter crust that browns evenly.
⭐ Italian-Seasoned Breadcrumbs
Pre-seasoned with herbs, garlic, and spices
Convenient and flavorful
Perfect for chicken Parmesan or Italian-style cutlets
⭐ Mix of Panko + Classic (Best of Both Worlds)
Many cooks prefer to combine both for:
crunch from panko
full coverage from classic crumbs
This gives you a super-crispy yet well-adhered coating.
Chicken Cuts You Can Use
One of the strengths of this easy breaded chicken recipe is its flexibility—you can use several different chicken cuts depending on what you already have.
⭐ Chicken Breasts (Most Common)
Slice them in half or pound them into thin cutlets
Cook quickly and evenly
Mild flavor that pairs well with crispy coatings
Ideal for 20-minute meals
⭐ Chicken Cutlets
Pre-sliced thin breasts
Require minimal prep
Perfect for shallow frying or baking
⭐ Chicken Tenders
Naturally tender
No pounding required
Kid-friendly
Great for quick frying or air frying
⭐ Chicken Thigh Cutlets
Juicier and more flavorful
Slightly longer cooking time
Excellent for frying when pounded thin
⭐ Optional: Chicken Schnitzel Style
If you want a thinner, larger portion, pound the chicken even more to create a schnitzel-like cutlet with extra surface area for maximum crispiness.
How to Make This Breaded Chicken Recipe (Step-by-Step)
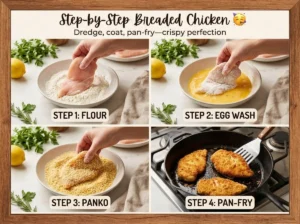
Follow the easy step-by-step process to coat chicken breasts in flour, egg, and panko for the perfect crispy breaded chicken.
Making this easy breaded chicken recipe is simple once you follow the classic dredge → coat → pan-fry method. Each step ensures the chicken cooks quickly, develops a perfectly golden brown crust, and stays juicy on the inside. You don’t need special equipment—just a good skillet, basic pantry ingredients, and a few minutes to set up your breading station. This method works whether you’re shallow frying in a pan or adapting it for baking or the air fryer.
Below is the exact process to help you nail the texture and flavor every single time.
Step 1 — Prepare the Breading Station
To get a crisp, well-adhered coating, you need a simple three-bowl breading station. Organizing this before touching the chicken keeps everything clean and efficient:
Bowl 1: Seasoned Flour
Add all-purpose flour, salt, pepper, paprika, garlic powder, or any seasonings you prefer.Bowl 2: Egg Wash
Whisk together eggs with a splash of water or milk. This helps the coating stick to the chicken.Bowl 3: Breadcrumbs or Panko
Fill the last bowl with breadcrumbs, panko, or a mix of both for extra crunch.
Place the bowls side-by-side for a smooth workflow. This setup ensures every piece of chicken gets evenly coated and prevents clumping.
Step 2 — Bread the Chicken Properly
This is where texture happens. Proper breading ensures the coating won’t fall off and will crisp up beautifully.
Pat the Chicken Dry
Removing surface moisture helps the breading stick.Dredge in the Flour
Coat each chicken piece lightly but fully. Shake off excess so the crust doesn’t become gummy.Dip Into the Egg Wash
Submerge the chicken to fully wet the surface—this is the “glue” for your outer coating.Press Into Breadcrumbs
Gently press the chicken into the breadcrumbs or panko, ensuring full coverage.
Don’t skip pressing—this creates the thick, crunchy outer layer.Rest for 2–3 Minutes
Letting the coated chicken sit briefly helps the crust bind before frying, reducing flaking.
Done correctly, the chicken will have a dry, well-adhered crust ready to become perfectly crisp.
Step 3 — Pan-Fry to Crispy Perfection
Now it’s time to transform the breaded chicken into a golden brown, irresistibly crunchy cutlet.
Heat the Oil
Warm a thin layer of frying oil in a large skillet over medium heat. You’re not deep frying—this is classic shallow frying.
Entities: skillet, frying oil, shallow fryingAdd the Chicken
When the oil shimmers, carefully place the chicken in the pan. Avoid overcrowding so the crust stays crisp.Pan-Fry Until Golden
Cook 3–4 minutes per side, or until the coating is deep golden brown and the chicken reaches 165°F (74°C) internally.
LSI keyword: pan-fry, golden brownDrain Properly
Place the chicken on a wire rack or paper towels to remove excess oil. A rack keeps the underside crispy.Serve Immediately
Breaded chicken is at peak crispiness right after cooking—perfect with lemon wedges, salad, pasta, or veggies.
Looking for a slow-cooked option? Check out our stovetop beef stew recipe
Tips for Extra Crispy Breaded Chicken

Tips for achieving perfectly crispy breaded chicken: remove moisture, use proper oil temperature, and rest on a rack after frying.
Getting that restaurant-style crispiness with a truly crunchy coating is all about technique. Even if you follow the basic breading steps, a few small adjustments can dramatically improve the texture and help prevent soggy breading. These tips use key entities like moisture removal, proper oil temperature, and letting the chicken rest on a cooling or resting rack, ensuring your breaded chicken stays light, crunchy, and golden every single time.
1. Remove Excess Moisture From the Chicken
One of the biggest causes of soggy breading is too much moisture on the chicken surface.
Before dredging:
Pat the chicken breasts or cutlets thoroughly with paper towels.
Allow them to air-dry for a few minutes for even better adhesion.
Why it works:
Dry chicken helps the flour stick better, which helps the egg adhere, which helps the breadcrumbs bind firmly. This prevents the coating from lifting or falling off while frying.
2. Season Every Layer for Maximum Flavor
To enhance both crispiness and taste:
Lightly season the flour,
Season the egg wash,
And also season the breadcrumbs or panko.
This adds depth while ensuring the crust is flavorful and evenly cooked.
3. Use Panko Breadcrumbs for a Crunchier Exterior
Panko, which is airier and lighter than traditional breadcrumbs, delivers a superior level of crispiness.
You can also use:
A 50/50 mix of panko + traditional breadcrumbs
Panko mixed with grated Parmesan for extra crunch & flavor
4. Use the Correct Oil Temperature (Very Important)
Keeping the oil at the proper frying heat—about 350°F / 175°C—is one of the most important factors for achieving a crisp exterior.
If the oil is too cool, the chicken absorbs oil → soggy coating.
If it’s too hot, the outside burns before the inside cooks.
For shallow frying in a skillet, heat the oil until small crumbs sizzle on contact.
5. Don’t Overcrowd the Pan
When you pan-fry too many pieces at once:
Oil temperature drops
Steam builds up
Coating becomes soft instead of crisp
Fry in batches, giving each cutlet room to crisp and turn golden brown on all sides.
6. Use a Cooling Rack After Frying
Instead of placing fried chicken on paper towels, use a resting rack set over a baking sheet.
Why this matters:
Paper towels trap steam under the chicken and make the coating soggy.
A wire cooling rack allows air circulation so the coating stays perfectly crispy.
7. Let the Breading Set Before Cooking
After breading the chicken:
Let it rest for 5–10 minutes on a tray.
This helps the layers bind together, reducing the chance of the coating falling off during frying and increasing overall crispiness.
8. Optional: Double-Coat for Extra Crunch
For an ultra-crispy crust, use a double dredge:
Flour
Egg wash
Breadcrumbs
Back into egg
Finish with breadcrumbs again
The result: a crunchy, thick, satisfying crust that stays crisp even after cooling.
9. Add a Little Oil to the Breadcrumbs (For Oven-Baking)
If you’re baking instead of frying:
Toss the breadcrumbs or panko with 1–2 tsp of oil
Or spray the breaded chicken lightly with cooking spray
This helps the crust turn crispy in the oven without drying out the meat.
10. Don’t Flip Too Early
Let each side fry long enough to form a solid crust before turning.
If you flip too soon:
Breadcrumbs fall off
Coating becomes patchy
Crispiness is reduced
Wait until the underside is beautifully golden brown before flipping.
Variations You Can Try
One of the best things about this easy breaded chicken recipe is how versatile it is. Whether you’re looking for a lighter option, a faster method, or a dietary-friendly version, there are plenty of ways to adapt the recipe without losing that delicious crispy coating and tender interior. Here are the most popular variations you can try at home:
Baked Version (Healthier & Lower Oil)
If you want a healthier take on this breaded chicken recipe, baking is an excellent option. Using a convection oven helps circulate hot air around the chicken, giving you a crisp, golden crust without deep frying.
How to make the baked version:
Preheat your oven to 425°F (220°C)
Place breaded chicken on a lightly greased baking sheet or wire rack
Spray the top lightly with cooking oil to enhance browning
Bake for 18–22 minutes, flipping halfway
The chicken should be golden brown with an internal temperature of 165°F (74°C)
This version uses less oil, still delivers crunch, and is perfect for meal prep.
Air Fryer Version (Extra Crispy & Quick)
The Air fryer is one of the best tools for getting ultra-crispy chicken with minimal oil. Hot circulating air creates an evenly browned crust — similar to deep frying but much lighter.
How to make the air fryer version:
Preheat the air fryer to 400°F (200°C)
Place chicken cutlets in a single layer in the basket
Spray lightly with oil
Cook for 8–10 minutes, flipping at the halfway point
Continue cooking until the coating is crisp and the chicken is fully cooked
This method is great for:
Quick lunches
Healthy dinners
Crispy chicken that tastes fried
Gluten-Free Breading (Crunchy Without Wheat)
If you’re avoiding gluten, you can still enjoy a perfectly crisp breaded chicken by swapping out the traditional breadcrumbs.
Gluten-free options:
Gluten-free panko breadcrumbs (best crunch)
Crushed gluten-free crackers
Almond flour + Parmesan mix (low-carb and flavorful)
Crushed cornflakes (classic extra crunchy option)
Tips for gluten-free breading:
Pat the chicken completely dry so the coating sticks
Use the same dredge → coat → fry steps
Avoid overloading with wet ingredients — gluten-free crumbs absorb faster
What to Serve With Breaded Chicken
Breaded chicken is incredibly versatile, which makes pairing it with side dishes easy and fun. Because the chicken already delivers a crispy, savory, golden-brown coating, you want to balance it with sides that add freshness, creaminess, or hearty comfort. Whether you’re serving this as a quick weeknight dinner, a family meal, or a meal-prep option, these pairings will help you create a complete, satisfying plate.
Fresh Options (Light & Refreshing)
If you’re looking to brighten up the dish, a fresh salad is the perfect match. The crisp vegetables contrast with the crunchy chicken, and the acidity from a vinaigrette cuts through richness. Try:
Mixed green salad with lemon vinaigrette
Tomato and mozzarella salad
Crunchy coleslaw (Italian or classic style)
Adding a few lemon wedges on the side also enhances flavor and adds a burst of brightness. A squeeze of lemon over the crispy coating makes the chicken taste even fresher.
Comforting & Hearty Sides
If you’re in the mood for something warm and filling, pair the chicken with classic comfort dishes like:
Creamy mashed potatoes
Garlic butter potatoes
Roasted baby potatoes
Warm buttered vegetables such as green beans, carrots, or zucchini
These sides soak up the chicken juices and complement the crispy texture beautifully.
Pasta Pairings
Because breaded chicken cutlets are popular in Italian-American cooking, they naturally pair well with pasta dishes. You can serve:
Buttered parmesan pasta
Simple garlic and olive oil pasta (aglio e olio)
Tomato basil spaghetti
Creamy Alfredo pasta
The combination of tender noodles and crunchy chicken is a guaranteed hit.
Lighter Starch Options
If you prefer something healthier or meal-prep friendly, serve the chicken with:
Steamed or sautéed vegetables
Rice pilaf or lemon rice
Couscous or quinoa bowls
Roasted or grilled asparagus
These lighter options make the dish balanced without feeling heavy.
Bread & Sandwich Ideas
Breaded chicken is also perfect for sandwiches or sliders:
Brioche bun with lettuce, tomato, and mayo
Italian sandwich with provolone and marinara
Chicken cutlet sub with melted mozzarella
This is a great option if you’re making multiple cutlets and want variety.
Storage, Reheating, and Meal Prep Tips
Storing and reheating your breaded chicken recipe the right way ensures you keep that crispy coating and juicy interior—even days later. These tips help you maintain maximum freshness, prevent soggy breading, and keep the chicken tender whether you’re meal-prepping for the week or saving leftovers for a quick lunch.
Proper storage starts with cooling the chicken completely before placing it in an airtight container. This prevents trapped steam from softening the crust. Once sealed, the chicken lasts 3–4 days in the refrigerator, making it a perfect high-protein option for meal prep or fast weeknight dinners. To freeze, place the cooked cutlets in a single layer on a baking tray, freeze until firm, and then transfer them to freezer-safe bags. This keeps the coating intact and prevents sticking.
Reheating is where many people go wrong—using the microwave leads to a soft or rubbery texture. Instead, aim for reheating methods that restore crispiness. The ideal reheating temperature is 350°F (175°C) using an oven, toaster oven, or air fryer, which helps to re-crisp the coating while gently warming the interior. Always place the chicken on a wire resting rack or a lined baking sheet for better airflow and crunch. If you must use a microwave, re-crisp in a skillet afterward to revive the texture.
These easy techniques make your breaded chicken taste almost as good as fresh—perfect for salads, sandwiches, wraps, or quick protein additions throughout the week.
✔ Summary of Storage & Meal Prep Tips
Cool completely before storing
Use an airtight container
Refrigerate for 3–4 days
Freeze cooked cutlets individually for longer storage
Reheat at 350°F (175°C) for best texture
Avoid microwaving unless finishing in a skillet afterward
Keep on a wire rack to maintain crispiness
Frequently Asked Questions
Cooking breaded chicken can sometimes raise a few questions, especially for beginners. Here, we answer the most common queries to help you achieve crispy, golden-brown breaded chicken every time.
Why does my breading fall off?
If your breaded chicken coating slips off during cooking, it’s usually due to one of these reasons:
Moisture on the chicken: Pat your chicken breasts dry with paper towels before dredging. Excess moisture prevents the flour-egg-breadcrumb layers from adhering.
Improper dredging: Make sure you follow the classic three-step breading process: flour → egg wash → breadcrumbs. Lightly press the breadcrumbs onto the chicken for better adhesion.
Oil temperature: If your frying oil is too cool, the breading absorbs oil and becomes soggy, causing it to slide off. Ideal shallow frying temperature is around 350–375°F (175–190°C).
Skipping resting time: Let breaded chicken rest for 5–10 minutes before frying. This allows the coating to set, reducing the chance of falling off.
Tip: Using a resting rack instead of a plate helps keep the coating dry and intact.
Can I bake breaded chicken instead of frying it?
Yes! Baking is a healthier alternative and still produces a crispy coating if done properly:
Preheat your convection oven to 400°F (200°C).
Place breaded chicken on a baking sheet lined with parchment or a wire rack to allow airflow.
Lightly spray or brush the breadcrumbs with oil to mimic the golden-brown finish of pan-frying.
Bake for 15–20 minutes (depending on thickness) until chicken reaches an internal temperature of 165°F (74°C) and the coating is crisp.
Tip: You can also use an air fryer for even quicker cooking with less oil. 10–12 minutes at 375°F usually works perfectly.
Can I use panko instead of regular breadcrumbs?
Absolutely! Panko breadcrumbs are coarser and flakier than traditional breadcrumbs, which makes them perfect for achieving an extra-crispy breaded coating.
Panko absorbs less oil, so the chicken stays lighter and crunchier.
You can mix panko with Parmesan cheese or seasonings for additional flavor.
For a gluten-free option, use gluten-free panko or almond flour in place of standard breadcrumbs.
What’s the best chicken cut for breading?
Chicken breasts: Most common choice, works well when pounded thin to ensure quick, even cooking.
Chicken thighs: Juicier than breasts; breading adheres well, but cook slightly longer.
Chicken tenders: Perfect for bite-sized portions, ideal for meal prep or kids.
Tip: Ensure cuts are uniform in thickness to prevent uneven cooking.
How do I store leftover breaded chicken?
Let chicken cool completely before storing.
Use an airtight container and refrigerate for up to 3–4 days.
Reheat in a convection oven or air fryer to restore crispiness. Avoid microwaving, which can make the coating soggy.
Classic Stovetop Beef Stew — from Bites of Beri Bites of Beri