The Best Instant Pot Whole Chicken Recipes For Rotisserie-Style Flavor
The Best Instant Pot Whole Chicken Recipes For Rotisserie-Style Flavor offers readers a fast path to moist, flavorful chicken with that beloved rotisserie-quality finish. By using the Instant Pot, you can achieve tender meat and juicy results in a fraction of the time of traditional roasting, while still delivering depth of flavor through smart seasoning and finishing techniques. In this post, you’ll learn core techniques for maximizing moisture, explore rubs and finishing methods to mimic rotisserie skin, compare fresh versus frozen options, and discover practical ideas for sauces, stocks, and meal prep.
Fundamentals of Instant Pot Whole Chicken Recipes
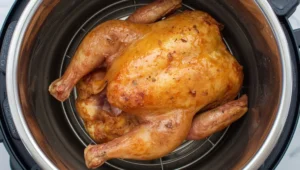
A whole chicken cooked in an Instant Pot, featuring tender, juicy meat with a lightly browned skin.
Subtopic 1: Core technique for juiciness
Purpose and overview
The goal is to maximize moisture retention and ensure even doneness while delivering a rotisserie-style flavor. This typically requires a two-stage approach: initial browning or searing to build flavor and seal juices, followed by pressure cooking on a rack above liquid to steam-cook the meat evenly.
Two-stage method in detail
Stage A — Browning/Sealing
If your Instant Pot supports it, use the Sauté function on medium-high and brown the chicken on all sides. Start breast-side down for a strong initial crust, then rotate to brown the other sides. This creates Maillard flavor and helps moisture retention by forming a flavorful surface.
Tip: Pat the chicken dry before searing to improve browning and reduce excess moisture that can lead to steaming rather than searing.
Stage B — Pressure Cooking with a rack on a trivet
After browning, add a small amount of liquid (broth, water, or a mixture with aromatics) to the pot. Place a metal trivet inside the pot and set the chicken on the trivet so it’s elevated above the liquid. This setup ensures the chicken cooks via steam/indirect heat rather than boiling in liquid, promoting even doneness and a juicy interior.
Close the lid, set to high pressure, and cook for the standard time based on weight (for example, about 6 minutes per pound as a common benchmark, then allow natural pressure release to finish the cook and help the juices redistribute).
Entity signals and practical framing
Core entities to emphasize: Instant Pot, pressure cooker, trivet, rack, rotisserie-style flavor. Mentioning these reinforces the foundational concepts readers will apply in their own cooking.
Practical tips
Use a rack or trivet so the chicken isn’t sitting directly in the liquid; this preserves the exterior texture and allows even heat circulation.
If your model has a “Sauté → keep warm” path, consider finishing with a quick broil or air-fry finish outside the pot (in an oven or air fryer) to simulate rotisserie skin, if desired.
Let the chicken rest after cooking (10–15 minutes) to allow juices to redistribute, which improves slicing ease and juiciness.
Subtopic 2: Timing and doneness benchmarks
Weight-based timing guidance
A widely used rule of thumb is approximately 6 minutes of high-pressure cooking per pound of chicken, with a natural release period that follows (often 15–20 minutes or longer, depending on the recipe and safety considerations). This approach yields a reliably cooked interior while preserving moisture.
For example:
4 lb chicken: roughly 24 minutes under high pressure, followed by 15–20 minutes natural release.
5 lb chicken: roughly 30 minutes under high pressure, followed by 15–20 minutes natural release.
Note: Actual times may vary by Instant Pot model, altitude, and starting temperature of the meat (fully thawed vs partially frozen). Always verify doneness with a reliable internal temperature check.
Doneness benchmarks and testing
Target internal temperature: 165°F (74°C) in the thickest part of the thigh, and 165°F (74°C) in the breast is a safe standard for whole poultry. Some readers prefer checking both breast and thigh to ensure even doneness.
Testing method
Use an instant-read thermometer inserted into the thickest part of the thigh without touching bone. If the thermometer reads 165°F (74°C) or higher, the poultry is safe to eat.
If the breast reads significantly below thigh temperature, it may indicate uneven cooking; consider an additional brief high-heat finish or repositioning during cooking if your setup allows.
Variations by model and setup
Some models implement a “zero-minute” or “short-time” high-pressure process to achieve a nearly identical end result with less active cooking time; these approaches rely on the pot’s pressure buildup and the natural finishing phase. When using such methods, rely on a tested recipe to determine exact times and release durations.
If starting with a fully frozen bird, expect longer total cooking times and a longer natural release period; ensure the internal temperature still reaches the safe 165°F (74°C) threshold before serving.
Practical considerations
Always thaw meat adequately for most predictable results, unless you’re following a tested method for frozen poultry. Partial thaw can still work, but timing becomes less predictable and may require extended cook times.
Rest time after cooking is as important as the cook time itself, enabling the juices to re-distribute and improve the final texture.
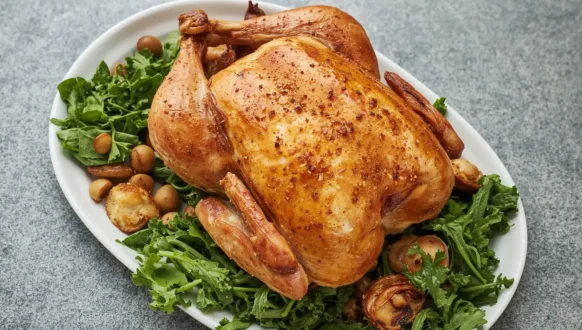
Flavoring and Rotisserie-Style Techniques
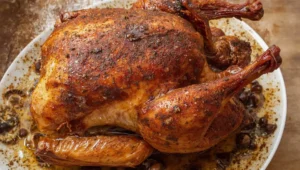
A rotisserie-style whole chicken with deeply browned, seasoned skin and succulent meat.
Subtopic 1: Rubs, marinades, and seasoning blends
Purpose
Well-chosen rubs and marinades provide the core flavor that distinguishes rotisserie-style results from plain pressure-cooked chicken. Layering spices builds depth, while oil helps carry aromas and promotes even browning.
Reliable rub templates (three core styles)
Herb-forward rub: combine dried thyme, rosemary, oregano, garlic powder, sea salt, black pepper, and a touch of lemon zest or dried lemon peel. Oil the skin lightly before applying to help the herbs stick and to promote a pleasant crust.
Citrus-zest rub: mix paprika, garlic powder, onion powder, dried oregano, black pepper, kosher salt, and finely grated lemon or orange zest. The citrus notes brighten the finished flavor and pair well with a quick finishing roast.
Smoky rub: blend smoked paprika, chili powder, brown sugar, garlic powder, onion powder, cumin, salt, and a dash of cayenne if heat is desired. The sugar aids caramelization and gives a rotisserie-like glaze when finished under heat.
Layering and browning
Apply the rub evenly across all surfaces, including the cavity if desired, and allow it to sit for 15–30 minutes if time permits to let the salt draw out a bit of moisture that helps the rub adhere.
If the Instant Pot supports a sear function, perform a quick initial browning to lock in flavor. Start with the breast side down to create a robust Maillard crust, then rotate to brown other sides. This builds a foundational flavor profile that carries through the rest of the cook.
Finishing note
For best results, consider pairing rubs with aromatics inside the cavity (halved onion, lemon, garlic), which infuse the meat with complementary scents during pressure cooking.
Subtopic 2: Finishing touches for that rotisserie skin
Finishing strategies for crispy skin
Under-broil in a conventional oven: After pressure cooking, transfer the chicken to a foil-lined pan and broil on high for 2–5 minutes, watching closely to avoid burning, until the skin achieves a desirable crispness and color.
Instant Pot finishing lid or air-fry option: If available, use an Air Fry/Lid accessory or a dedicated finish setting on the pot to crisp the skin directly. This method minimizes handling while delivering a rotisserie-like crust.
Quick oven finish with a rack: Place the cooked chicken on a rack over a sheet pan and broil briefly. This avoids extra liquid pooling and helps render fat for a crisper skin.
Moisture retention during finishing
Shield with foil: Tent the chicken loosely with foil for a minute or two if the skin starts to color too quickly; this helps retain juiciness inside without sacrificing the exterior texture.
Rest before slicing: Allow a 10–15 minute rest after finishing. Resting redistributes juices and helps maintain moisture when you cut into the bird.
Visual and sensory cues
Look for evenly browned skin with a uniform, appetizing color and a light, crackly texture rather than a hard crust. The aroma should reflect the spice blend used in the rub, with hints of garlic, citrus, or smoke depending on the chosen profile.
Fresh vs Frozen and Variations
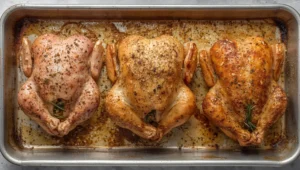
A tray of three herb-seasoned whole chickens with golden-brown skin and pan drippings.
Subtopic 1: Fresh chicken variations
Purpose and approach
Fresh chicken provides the most predictable results in the Instant Pot: more even heat distribution, reliable browning, and consistent texture. When well-seasoned, a fresh bird yields juicy meat and robust flavor, closer to rotisserie-style results.
seasoning, stuffing, and roasting for maximum juiciness
Seasoning strategy: apply a balanced rub to the exterior and, if desired, a lighter seasoning under the skin to infuse the breast and thigh meat without overpowering the surface. Aim for a 1/2 to 1 teaspoon per pound mix, adjusted for your rub style.
Cavity aromatics: place aromatics inside the cavity (e.g., halved lemon, garlic cloves, sprigs of thyme or rosemary) to perfume the meat from the inside, enhancing overall flavor without needing extra time.
Stuffing considerations: if stuffing the cavity, keep quantities modest to prevent overcrowding and ensure even heat; consider using aromatic chunks (onion, citrus peels) rather than dense bread-based fillings, which can increase cooking time.
timing adjustments and muscle memory tips
Fresh birds typically cook closer to standard weight-based timing (e.g., 6 minutes per pound with natural release post-cooking). Keep in mind variations by model and altitude.
For evenness, consider rotating the bird halfway through the cook if your pot allows access, or briefly flipping the bird during the natural release phase to promote uniform texture.
Subtopic 2: Frozen and quick-change methods
Timing and preparation for frozen or partially frozen birds
Frozen or partially frozen birds generally require longer pressurized cook times and potentially extended natural release, since the interior starts colder. Use a tested frozen-chicken protocol as your baseline to avoid under- or overcooking.
Do not rely on thawing during cooking; if starting from frozen, pre-thaw when possible or allow for a safe margin in total time to reach doneness.
Adjusting pressure-cook times and texture trade-offs
Time extensions: anticipate roughly an additional 5–10 minutes of high-pressure cooking per pound when starting from fully frozen state, followed by a longer natural release to help juices redistribute.
Texture considerations: frozen poultry tends to finish more uniformly in the center but can occasionally yield a slightly drier exterior if overcooked. Mitigate by watching total time closely and finishing with a brief external crisping step if you crave rotisserie-like skin.
Finishing and texture alignment
Because the interior can be quite evenly cooked from frozen starts, you may emphasize finishing techniques (broil, air-fry finish, or oven broil) to achieve the signature crisp skin and color that readers expect from rotisserie-style chicken.
Practical tips for readers
When using frozen poultry, plan for extra resting time after cooking to accommodate juices redistributing through the colder interior.
Layer aromatics in the pot and consider a rub that complements both fresh and frozen outcomes; citrus-forward rubs and smokier rubs tend to translate well regardless of starting state.
Always verify doneness with a reliable thermometer, aiming for an internal temperature of 165°F (74°C) in the thigh and breast, and consider checking multiple sites to ensure even cooking.
Sauces, Stocks, and Meal Prep
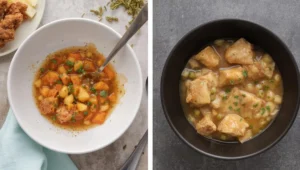
Tender chicken pieces served with a savory gravy and fresh herbs.
Subtopic 1: Gravy, sauces, and stock ideas
Core purpose
Show readers how to turn the cooking liquid into a flavorful gravy and how to leverage the carcass to build a simple, versatile stock for future meals. This reinforces the rotisserie-style kitchen efficiency readers crave.
Simple gravy from Instant Pot liquids
Basic pan gravy approach: after cooking, remove the chicken and strain the liquid. Return the liquid to the pot, bring to a simmer, and whisk in a thickener (one of these options) to desired consistency:
Cornstarch slurry: 1 tablespoon cornstarch whisked with 2 tablespoons cold water per cup of liquid, simmering until thickened.
Roux-based method: 1 tablespoon butter and 1 tablespoon flour cooked briefly, then whisk in hot cooking liquid until smooth.
Optional flavor boosters: a splash of soy sauce or balsamic for depth, a teaspoon of Dijon for brightness, or a pinch of lemon zest to lift aromatics.
Quick flavor tweaks: stir in a pat of cold butter off the heat for gloss and richness, or finish with a dollop of sour cream or cream for a silky texture.
Quick stock from the carcass
Post-cook carcass stock idea: pick off usable meat, then simmer bones with onion, carrot, celery, and a bay leaf in water. Pressure-cook in an alternative pot or simmer on the stove until flavors concentrate, then strain. Use this stock as a base for soups, gravies, or creamy sauces.
Practical tips: roast or toast the bones lightly before stock-making to deepen flavor; deglaze the pot with a splash of wine or water to lift fond before returning to stock-making.
Reader-friendly tips
Include a printable “Gravy Quick-Start” card with the basic ratios for your audience (liquid-to-thickener ratios, preferred thickeners).
Provide a one-page “Stock Quick-Start” guide with a simple rubric: bones, aromatics, water level, and pressure or simmer time.
Mention the safety and storage: gravy keeps in the fridge up to 3–4 days or can be frozen; stock can be frozen in ice-cube trays for convenient portions.
Subtopic 2: Make-ahead and meal-prep strategies
Core purpose
Emphasize efficiency: portioned leftovers from a single batch can power multiple meals (tacos, soups, salads, bowls), reducing daily cooking time and waste.
Make-ahead workflow
After cooking, shred or slice the chicken and portion into meal-sized containers. Label with date and suggested usage (e.g., “taco mix,” “soup base,” “salad topping”).
Store timing and guidelines:
Refrigerate: up to 3–4 days for cooked chicken portions.
Freeze: up to 3 months for cooked chicken portions in airtight containers or freezer bags; use a quick-thaw method in the fridge or microwave when ready to use.
Meal-prep ideas that work well with Instant Pot chicken leftovers
Quick tacos or burritos: mix leftover chicken with chili lime, cilantro, and salsa; pair with tortillas and toppings.
Soups and stews: use the stock as a base for a comforting soup, adding vegetables and grains or noodles.
Grain bowls: combine chicken with quinoa or rice, roasted vegetables, and a dollop of yogurt or lemon-tahini sauce.
Salads and wraps: cold chicken over greens with a bright vinaigrette; use in wraps with crunchy veggies.
Plan-ahead tips to maximize batch value
Create a simple “two-week rotation” plan where a single batch of Instant Pot chicken covers multiple meals across different genres (Mexican, Asian-inspired, Mediterranean, and comfort-food styles).
Batch-produce staples: roast aromatics (onions, garlic, citrus) or prepare a basic herby vinaigrette that pairs with multiple leftovers to keep meals cohesive and flavorful.
Reader-actionable takeaways
Provide a one-page printable meal-prep blueprint: a fill-in-the-blank schedule for when to cook, portion, refrigerate, freeze, and reheat, plus quick recipe ideas tied to the four-quarter plan.
posted by SarahK on November 12, 2025
Helpful, much appreciated.